Nav area code

Retro Restyling - Restore - Restyle - Repurpose
Retro Restyling on FacebookRetro Restyling on TwitterRetro Restyling on PinterestRetro Restyling on Instagram

Thursday, December 30, 2010

Apothecary Glass Jar Etching

Hey guys!!!! It's Thursday, which is one day closer to Friday and one more day closer to the New Year!!! I wanted to share with you the DIY Christmas gifts I made so tomorrow I can share with you my goals for 2011 and some furniture I got over the last month.

For Christmas I made my best friend and my in-laws personalized apothecary jars. They weren't necessarily personalized with their names, but rather something that is personal to them. My best friend, who creates some amazing jewelry under the moniker Archaic Mementos, is always full of ideas so I wanted to give her a place to write them down before they flew away (she likes birds so I had to tie that in). As for my in-laws, well things have been tough this past year financially for a lot of us, especially them, so I wanted to give them a place to write their hopes down. I figured, before you lose any hope you better write it down and keep it safe.

I would like to admit that this idea is definitely not one I created myself. I have seen glass etching done before as a craft, but before Thanksgiving Young House Love shared with their fans a wonderful idea for a "Thanks" jar for their home. Every day starting Nov. 1 they would write what they were thankful for and put it in the jar until Thanksgiving day when they take them out and read them all. I thought, what a great stinkin' idea for a present! Because I like to challenge myself with a creative idea I decided to hit up Hobby Lobby to buy the supplies and take a chance at the tutorial.

My two standard apothecary jars. Check this out, I got them half off! Score!
I love Hobby Lobby 50% off sales.


The "ideas" font is called Bauhaus 93 and wouldn't you know I didn't save the file to print these out so I don't remember the other font I used for "hopes". FYI: I find great free fonts at 1001freefonts.com. I used some 1.5 inch painters tape (that needed to be overlapped because it wasn't wide enough) and some masking tape to hold the paper down to the painters tape to the cutting board. 


I took an X-acto knife and carefully and slowly cut the letters out of the tape. If you are doing this, make sure your knife is sharp to get those corners well. Then I pulled up the letters and pulled up the painters tape and centered it on the glass. I put two strips of tape on either side to be safe.  

Yeah... I lost my O, P and E middles in my "hopes". Oh well, I hoped it would turn out ok. (Ha! I had to throw that in). The Bauhaus font was one continuous line so I didn't loose any insides of those letters. In YHL's tutorial they lost their a-hole in Thanks... and because I have an inner 12 year old inside of me like they do in them I thought it was hilarious.


Then, because I have a slightly large case of OCD and I was nervous I was going to screw up, I made sure I had their tutorial open on my phone so I could keep referring back to what I needed to do when putting the Armor Etch glass etching cream on. Another FYI: this tiny bottle is expensive, but a little goes a looooong way if you plan on doing small projects like this. I did apply it thick with a small paint brush to make sure the letters were completely covered up. I only let the cream sit for about a minute and a half because that's what Sherry and John did in their tutorial and I'm a by the book kinda gal. I noticed the tape starting to melt a little and rinsed it off immediately.


I bought some scrap book paper in colors I knew my present getters would like. Green and purple for the in-laws and this really cool dark and light blue tree pattern paper that had a deep red bird print on it for my bestie.


And here is the finished result:


This is definitely a project I didn't master the first time around mainly because the cream bled a little and there are parts around some letters that are smudged. Plus I don't think it sat long enough to "etch" darker. Don't get me wrong, I think they are pretty cool looking and unique enough to be personalized. I just think next time I will find a different "tape" material to carve into that will be able to withstand the cream.

Have you guys tried any etching projects? Did they turn out like this?
Please make me feel better tell me they did... I mean, share your stories with me!!!

;)

See ya tomorrow everyone!

~ Susan ~

Wednesday, December 29, 2010

But a Nook Can't Read....

Hey everyone out there in the world wide interwebz!!! Ohh... Emm... Gee... I love me some Christmas but I am so glad it's over with. That is bold and underlined for a reason. I remember the days where all I had to do was wake up, run downstairs to the tree, open gifts and stay in my jammies and play with my toys all day long. Now that I have kids it's like I have to have a planner to schedule all the grandparent visits to make sure we hit up all their houses and don't leave any one out. It's stressful to say the least, especially when their homes range from 20 to 70 miles away. The good thing is I did a few DIY presents for family and friends so that was a little relaxing and fun!

The first gift I made was a special one for this chic chica who inspires me daily! I introduce you to Kristen Fountain Davis from KFD Designs! If you've been following me for awhile you know I love being surrounded by creative people and I appreciate those who take the time out of their day to help me when I need it. That's one of the reasons I made Barb Blair from Knack Studios this cute little dresser gift for Christmas. When I jumped on the "furniture restyling" train back in May of this year, I had first ran across Kristen's blog and was very inspired by all the colorful transformations she did to interiors and furniture. When I finally put hand to paint roller there were a lot of questions that I needed answers to, and even though Google is the answer guru, I just wasn't getting what I wanted from it. So I decided to email bug the crap out of Kristen a few times to see if she could help me. Before I go on... when you go to Kristen's blog the first thing you will see is a 4 squared picture of herself holding paint brushes. Her pictures completely describes the person she is... sweet, kind and possessing a twist of humor! That is exactly the person I got on the responding end to my emails, and for that I was grateful. So in appreciation of her gift of knowledge to me, I gave her a gift in return. :)

If you follow Kristen you will know she has a love for Dr. Seuss, which is something special she shares between her and her dad. Which is totally cool because I myself have a love for the Dr., my favorite book being "One Fish, Two Fish, Red Fish, Blue Fish". So I thought, what would be more perfect than a Dr. Seuss themed gift?! 

I made her Gox Box Socks and A Nook Can't Read Ornament! 

Sock inspiration...


Materials... Black socks and yellow pom poms. 


This picture makes me laugh...


I hot glued the balls on the sock while it was on a glass, which by the way, hot glue will adhere to glass but will pop off quite easily and leave no mess behind. I needed to make sure the sock was a bit stretched so she could get her foot into it because after it's glued it's staying that shape. Granted, I was hoping she didn't have mammoth feet, but hey... she looks tinier than me and I am 5' 9" and a 9.5 shoe so I wasn't too worried. ;)

And the finished socks, sorry about how dark that is. My camera hates my kitchen lighting.


Ornament inspiration...


I got these little pieces of wood and red acrylic paint from Hobby Lobby. They were just perfectly sized!


I painted the wood then took a black permanent marker and wrote How to Cook on both sides that would be facing out. Then I hot glued them together and sealed them with some poly. Note to self: marker will streak when poly is painted on it. Grrr... Afterwards, I folded some printer paper and wrote a Thank You on the first page and the whole Nook Book poem on the visible pages. 


Then I hot glued the pages to the book, hot glued some twine in there to hang it and voila! Now there is a cute little How to Cook Nook Cook Book ornament! Phew... say that 3x fast!


I packed it up with a little thank you note and sent it on it's way!


I got the email from Kristen that she got the package and loooooved the gifts! Yay! I'm so happy!

I didn't really assume she would wear the socks out of the house, but all I need now is a picture of her wearing them and that will make my day - and make me laugh a little a lot

Keep your eyes pealed for a few more posts from me this week. I want to share the other DIY project I did and a piece of furniture that I got for Christmas that is absolutely amazing!

Thanks for stopping by today and while you are here leave me some comments! :)

~ Susan ~

Wednesday, December 15, 2010

The Gift of Inspiration

In May of 2009 I found myself in a predicament that many people ended up having that year, I lost my job. It wasn't just any job though, it was one I went to school for (Web Design) and I woke up every morning feeling happy that I was doing something I loved. Needless to say when I lost it I was beside myself. I was so distraught that I wouldn't even sit in front of a computer. (To this day, even though I am over the loss, I haven't built another website since.)

I sat here in a serious state of depression not knowing what to do. Days went by, which turned into months which turned into a year. I was at a loss of what to do with my life. Should I go back to school, should I just get a regular job and be unhappy, should I do something I have always dreamed of doing? Aimlessly I meandered through my days until I found myself searching on Craigslist for a desk and a chair for my son. I had never painted a piece of furniture in my life and had no idea really how to do it right. Because Google is the answer to pretty much everything, I went online and started searching for "how to paint furniture". Lots of great sites were out there displaying the talents of furniture artisans and their restyling capabilities - Young House Love, Kristen F. Davis Designs, and Knack Studios were some of the ones that I fell in love with immediately. I was so intrigued with the ability to transform a piece of furniture into something so beautiful that I was determined to learn how to do it. I thought, you know.. if they can do it, I can do it and since May of 2010 I've been running and gunning to get a business up and going. 

But even though I frequented those sites I was head over heals in love with Knack Studios. Barb Blair, the creator of all those fine works of restyled art, was someone who I admired wholeheartedly. Not only was she talented, she took the time to connect with her "fans" on a personal level. At one time I was sooooo frustrated with a piece of furniture that I was working with I ended up posted my frustration on a tutorial she did for Design Sponge. She took the time out of her busy schedule to email me and help me through it every step of the way.  I was amazed and became a loyal fan and huge supporter of her work. The only way I figured I could repay her was to constantly leave positive comments on her blog as much as I could. Then...I got this great idea.

It's Christmas.... what could I do for Barb to thank her for her gift of inspiration? I'll make her an ornament! Not any ornament though... a piece of furniture, one in her favorite color, with some cute stuff on it! Then the brainstorming hit me like a category 5 hurricane.

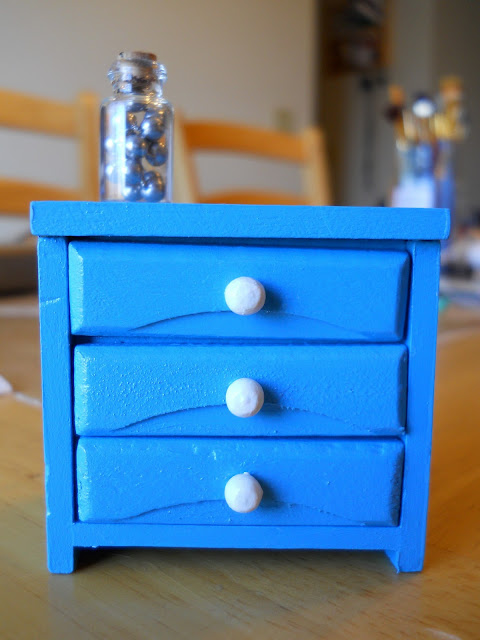
First off... I searched through Barb's pictures looking for a dresser with her favorite color for inspiration, which wasn't hard to find. ;) Then I hit up Hobby Lobby, grabbed some paint, a doll house dresser, some scrap-booking paper and some little knick "knacks" for the top of it and went to work. I was on a mission to create a Knack-sterpiece!!!

 I got the dresser sanded and ready for paint. Look at how tiny it is!


I cut out some paper for the drawers to mimic the wall paper she uses to line them.


I grabbed some beads I had in my crafts and spray painted them silver with hopes that they would look really cute inside of this teeny little bottle.


Then, because I LOVE the paper decorations she has on her wall, I created one out of some junk mail I had just grabbed out of the mailbox. I took some craft wire I use for bows and wrapped it around a folded piece of paper and cut the excess off. I then hot glued the paper ends together so they stayed fanned out. And hey look... there's the painted dresser!


Check out the drawers....


Here is a close up shot with the bottle glued on.


And here is my inspiration with the finished ornament!!!


My cute little 5 year old helped me hold it up while I took the picture. I hot glued the wire behind the paper to the string so it looks like it's hanging above the dresser. Now granted, I'm no engineer so I didn't get the "hanging" part right and unfortunately when you pick it up by the string all the drawers fall out! LOL Oh well, I figured it would be cute to prop up on a branch of a Christmas Tree or maybe sitting on a table with a push pin holding up the string. Being SUPER excited that it turned out rediculously cute I mailed the box to Barb right away.

I shot an email to Barb before she left for Atlanta and told her to watch out for it, it was a small and very light box. Next I proceeded to bite my nails to nubs in hopes that she liked it when she got it. Of course I didn't tell her what was inside (I enjoy surprising people) and I was hoping she wasn't thinking I was some crazy girl sending her some random gift. ;) 

Anyways, to make a long story short which is waaaaaaaay too late she got it today and well.... 

read for yourself. ;)

FYI: I'm dancing over here... and crying a bit...

xoxoxox

Susan


Tuesday, December 14, 2010

Merry Christmas Trees

Well hello there everyone! Hey check it out, it's my first post in December! Wow, that's kind of sad. I know, it has been ages since I blogged and I apologize for that. I've been trying to balance finding a paycheck generating job, working on furniture, being a Super Domestic Engineer and dealing with the cold. Yup.. the cold has actually been slowing me down. After spending most of the summer outside working on furniture I've acclimated myself to the warmth. It was 11 degrees here yesterday... soooo not cool... Not only that, but being plastered to a computer job searching is pretty depressing in itself, especially when I have a studio directly under me calling my name.

So in the midst of all this craziness I finally got the determination to get the trees up. I didn't have much motivation with our old tree previously seen on my blog hiding under a sheet. Yeah we see you Charlie Brown tree!!! Even though the ornaments from last year were hand made, you could see right through the tree... so sad. :(


So my Dad decided to part with and donate to me his nice, big, full tree and his nice ridiculously expensive ornaments and lights that were collecting dust in his basement. This made me very happy and more in the Christmas spirit. So along with some home made apple cider and a little bit hours of 1950's Christmas music I whipped that baby out of the box and began the set up.

MANY HOURS AND CRACKED CUTICLES LATER...

Ok.... this tree is huge. I mean, it took forever to get all the branches out and manipulated to look like a real tree. Now I remember why I hot glued the branches into my Charlie Brown tree. I would also like to add that taking pictures of a Christmas tree and having a slight case of OCD does not blend well. As my friends over at freshoutoflemons would agree with me, it's really impossible to get the lighting right.


In the end I had my wee little "festive cubicle tree from my web design days" on an end table sporting all the DIY Candy themed ornaments and tree top bow that I made last year. If you look close you can see a circular home made ornament from my days back in Girl Scouts (aw look how cute I was) and a Strawberry Shortcake ornament (top left side).


I also have these two ornaments from when I was a kid too. Definitely early 80's going on here...


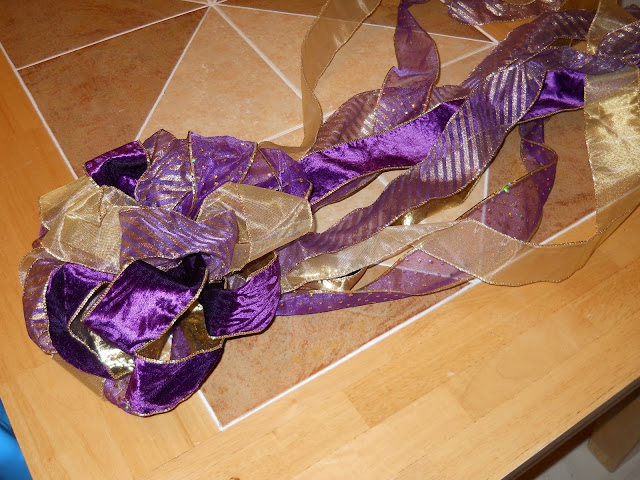
So I mixed some of my Dad's purple and gold ornaments and some of my glitter snowflakes and snowflake themed ornaments together to offset the gold. I'm just not a huge fan of gold and at first I was luke warm on the tree. But because I didn't have any garland I took these tree top bows Dad had made and broke them apart and made new smaller ones.


Smaller bows are cute!


I still have about 5 more to make to fill in the holes, but I think less is more with this ribbon. And now I can am satisfied with my trees. Now all I have to do is get wrapping paper to match.... ;)

Thanks for stopping by my blog today!

Tomorrow I will share with you a story (including pictures) about a gift I gave to a friend who inspired me to get into furniture restyling. 

xo Much Love xo

~ Susan ~


Related Posts with Thumbnails