Nav area code

Retro Restyling - Restore - Restyle - Repurpose
Retro Restyling on FacebookRetro Restyling on TwitterRetro Restyling on PinterestRetro Restyling on Instagram

Monday, December 31, 2012

Watch Out 2013, I'm Comin' Atcha!!


That's right 2013, you better watch out because I have your number and I plan on owning you!! You are going to be a great year! Don't you forget it, or try to run astray, because I have so much planned...so you're gonna be a busy and successful year!!! No back talking, it's happening so you best just hush!

I'm so pumped, can you tell? I just can't wait to get moving!!

If you're willing to take the trip with me, lets reflect back on 2012...
*insert Wayne and Garth doing the "flash back" hands and sound*

At the beginning of the year I took some time off because I was utilizing a gift from my maternal Grandmother who passed away in 2011. This is her holding my now 7 year old son. She lived on the other side of the states so I'm so glad that we had this time for her to meet him. Who knows when we would be back to see her again.... Unfortunately she became ill and we never got a chance to visit before she passed.


Thanks to her generosity, I paid some bills, took care of an extensive amount of hail damage on my truck (like over 200 dents and almost $3k worth of damage) bought my Canon T3 and put some money into my business.


After all that was settled I finished up my annual "thanks for being awesome" Christmas gift for Barb at Knack. I painted her a union jack chest and made this display shelf out of a left over drawer. I was so excited because I knew that many more wee pieces of furniture would be sent to her and this would be the perfect item to display them in.


Then my friend C and I got together and made plans for her 1930's dining room. Since I started working on furniture I would drool over her set every time I came to her house so I was stoked that she finally decided it was time for a makeover. Even though it's taken longer than I expected (I have one last piece to go, which is the china cabinet) each piece turned out AMAZING. I have received the best compliments on the yellow table and the matching chairs, but the blogosphere lost it (in a good way) when they saw the orange buffet. It was featured all over the place, pinned like crazy on Pinterest and just adored by the masses. That made me feel SUPER special and made C quite happy.


When I first initially started my journey with her furniture I planned to whip right on through it, but life jumped in the way a few times and stalled me out. In March we lost our Pop, which is my husbands maternal Grandfather, to a stroke. Losing him tore our hearts in two. This is Pop with our kids 7 years ago.


Right after Pop passed at the hospital we went outside and I looked up and saw this heart shaped cloud, and before it blew away I snapped a pic of it. 

We love you too Pop.

I got back to work on C's furniture, but when summer came we decided it was time that we move on from Collinsville, IL and move back home to Missouri. So we bought our first home in St. Charles. It was hard saying goodbye to our rented home because it's where my dream of restyling furniture started, but bigger and better things called to us and in the end we are happier that we own now.


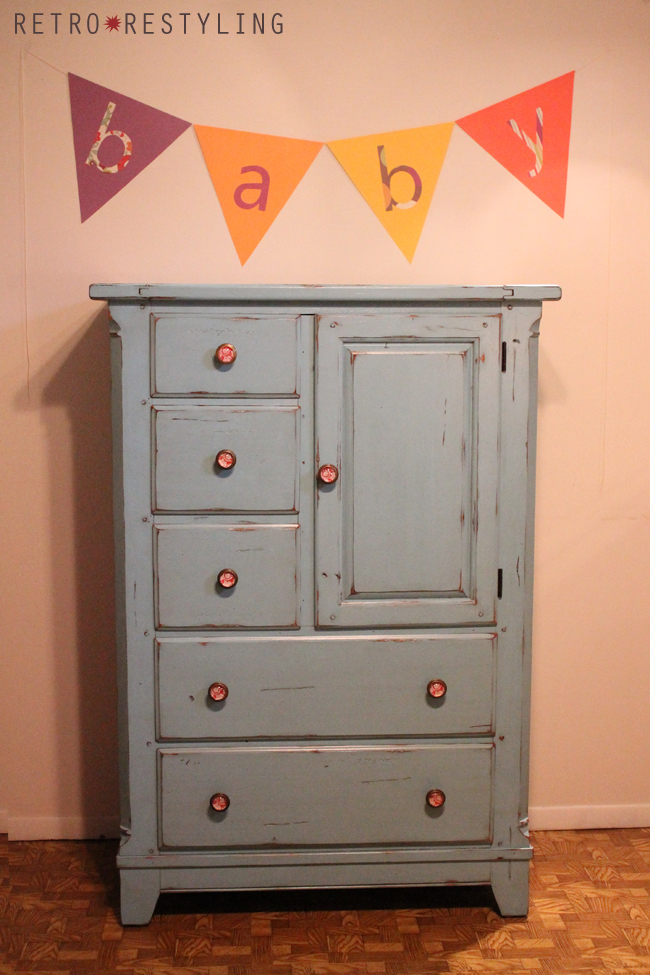
My good friend T, who I've known since the early 90's and who was our real estate agent, was pregnant through our whole house buying experience. In fact, I hadn't seen T since probably the late 90's and thanks to Facebook we reconnected. I was so ecstatic because I hadn't seen her in years and it was like time stood still and we were the same goofy kids from back then. After we moved in T wanted me to restyle a wardrobe for her baby Tallulah. It turned out very pretty and little Tallulah made her wonderful appearance the day after Christmas!!! She's B-E-A-yooootiful!!!


And as if the year couldn't have got any better, I was blessed to meet and work with a new customer Ms. L!! She had another 1930's set for me to work on plus other projects that are still up and coming!! This was the first piece completed of the set, a mini-buffet!


So throughout the year I had: hardships, losses, wins, re-connections, laughs, fun with friends, frowns, a few tears of frustration, a few days I didn't want to get out of bed, a few days where the bed couldn't hold me, aches and pains, excitement, feeling humbled, struggles, successes, praises, blessings in disguise... but even though there were so many ups and downs I'm still here. I'm still pushing on, persevering and determined to succeed and grow. 

I hope you enjoyed my walk through time. There was so much more I could add, but I'm sure you're groggy eyed by now. haha! I hope you stick with me through my journey in 2013, because like I said at the top of this post I'M GOING TO OWN IT. 

Have a safe and fun New Years and I'll see ya on the flip side!!\


Friday, December 28, 2012

Well That's Pinteresting | It's Spa Day for Your Shower!

That's right ladies, it's time for a spa treatment! Oh not for you, oh no... it's for your shower! Let's get those cleaning gloves on and give that dirty DNA water receptacle a good cleaning!

When I use to clean my showers I used Comet Bath Cleaner. Every single time I would spray it, even if I was covering my face with my shirt, I would gag and sneeze from the chemicals. So when I found this Martha Stewart recipe for a homemade tub/shower cleaner I just had to try it. Then I found this great idea on how to remove mildewy grossness from the caulking in your tub and thought, well heck... if I'm in here cleaning the shower I might as well put 5 more minutes of effort in and make it nice and sparkly.

There really isn't much to this other than simple house hold cleaners you should already have laying around, but if you don't, jog over to your local grocery store and grab what you need.

Supplies for your day at the shower spa:

water
1 teaspoon dish soap
1 cup baking soda
a dual sided sponge or scrub brush
a bowl
bleach
large cotton balls


Toss your 1 cup of baking soda in a bowl and add the teaspoon of dish soap and add just enough water to make it pasty. Not too thick, not too runny...it should look like this:


Now depending on the grossness of your tub (I know it's harsh to say, but common... some of our tubs really need this and you know it) you can either use a double sided sponge or a scrub brush. Even though mine was pretty dirty, I just used a sponge like this and put a heaping spoonful of baking soda mixture on it, then flipped it on the scrub side for abrasion. You will find that some will drip down into the tub, which is all good because you'll be using it down there too.


How dirty was my tub, you ask? This dirty. Not only had I just bathed my Sphynx kitty (she has major oils that come off of her which leave a nasty ring on the tub) I had dropped a bottle of shampoo and it sprayed everywhere plus there was the grimy soap crap on the walls too.


Here's the spotted dirty fixtures.


I used 2 heaping spoonfuls on the left wall, 3 on the large middle wall and 2 on the right wall with the fixtures, then a little more to clean the fixtures themselves. I would say I used a couple in the bath as well, plus all the stuff that dripped down. After a good rinsing I had a beautifully clean shower!


Hey look, there's me in the reflection!! So shiny!!


SOLD.
I'm never buying stinky chemical cleaners for my shower ever again.

Now on to that pesky mildew crud you see under my fixtures... (I do clean after midnight sometimes. haha!)


I poured some bleach into a small bowl (sorry Princess Jasmine...) then soaked a large cotton ball in it and stuck it up against the caulking to where I felt like it was snug enough to do it's job. You can use your fingers, or Q-Tips or whatever you want, just make sure it's nice and snug. Darn it if I didn't take a picture of this process, but I think you'll get the idea that you'll need to apply as many cotton balls to the area that is mildewed as you'll need. In the original pin the girl who tried this used the perm cotton strings you can get at a beauty supply store, but good 'ol regular cotton balls work too.

Here's my before pic. BLECH. GROSS. We just bought this house, so I'm getting use to its quirks, and that night whilst cleaning I found out that the water drips down the fixture underneath on the bottom and follows it down to the tub....hence the reason for the mildew build up right there. We have a couple other nasty areas as well, like the corners so I slapped some cotton balls there too.

Leave the cotton on overnight.


Awake in the morning, remove and toss your cotton balls and yell "BOOYAH" because the mildew will be totally gone.


Ahhhhhh... wasn't that spa treatment so relaxing?
Ok ok, cleaning is not relaxing, but rather satisfying instead knowing that you aren't spending a horrible amount on cleaners and you aren't damaging your lungs by breathing that nasty stuff in.

TIP TIME

1.
As you can see, my shower walls are tile and my tub is old school porcelain from the 70's. This concoction of baking soda and soap worked great in my situation. It should work well in yours too, if you have the same type of thing. I've also read that fiberglass shower/tubs will be ok and shouldn't scratch up using this mix.

2.
In the original Martha Stewart post they suggest using anti-bacterial essential oils like Tea Tree Oil. I didn't have any of that, and personally didn't see a use for it. And as for fiberglass showers, apparently essential oils can mar the surface, so I wouldn't suggest adding any to the mixture if you have a fiberglass shower/tub.

3.
I didn't even use all of the baking soda soap mix during this process, even though I was using heaping spoonfuls, so next time I think I might do 3/4 of a cup instead of a full cup.


I hope you enjoyed my shower cleaning day at the spa!

Make sure to pin one of my pictures from this post please
and have an amazing weekend!!


Monday, December 17, 2012

My Heart Bleeds for Newtown CT


I have shed many tears since Friday. MANY. I can't, in my right mind, put together the complete and total utter loss the Newtown, Connecticut community is going through right now. I mean, I can't make sense of it period. I can't imagine the pain and heartbreak the parents and siblings of the children lost, the family members plus surviving students of the school staff and the emergency responders who had to witness the gruesome crime are dealing with right now. I can't fathom it. I can politely say I feel your pain, sure I could say that... I've unexpectedly lost my brother, friends, grandparents... but how could you possibly feel the soul shattering loss of 20 innocent children and 6 adults who did nothing less than try to protect the children under their wings?

You can't.
I can't.
Unless you are in their shoes, it's impossible.

It all comes down to this, I have a 7 year old boy in First Grade, so this has all hit close to home which is why it's rattled me so. Since Friday all I could do was think about what if it was him? What if I lost him like this?

And I'll admit, I'm scared.

I was scared to let him go to school today. I'll be scared tomorrow. And probably the day after that. And people will say, you're letting the fear get into your head. Welp, yeah... I am. If something like this can happen in a quiet community like Newtown, CT who's to say some random crazy won't bust their way through my sons school and do the same thing? His school is 3 stories tall, but he's on the first floor closest to the doors. And the last time I checked, there's not a mandatory police officer there protecting the school like there is at the middle schools and high schools. I'm sure there is today, but how long with that last? A week? A month? Until this has died down and we forget about the loss? Or how about until it's quiet enough for the next random shooter to feel comfortable that we've let our guard down enough for their plans to be successful?

These are all questions that I'm sure run through the minds of parents world wide. I know I'm not the only one to be scared. But who do we have to beg to make this stop? What are our solutions? People everywhere have their own opinions on what we could do, and I'm not necessarily wanting to open that can of worms here, but this HAS GOT TO QUIT. Not just in the schools, but in public places... movie theaters, shopping malls, etc. These are places we are supposed to feel free, places we are supposed to enjoy and not feel threatened.

It's senseless.
It's tragic.
It's beyond heartbreaking.

Whatever solution you feel is right in your own mind, just remember to love the ones around you first and foremost. Without your loved ones, life is a big bowl of emptiness.

xoxox,

Friday, December 14, 2012

Well That's Pinteresting | Homemade No-Grate Liquid Laundry Detergent

For about a month I took some time in the evenings to research ways to save money by creating our own homemade items. I'm still doing research and messing with fickle recipes, but in the end even the "store label brands" like Wal-Mart's "EQUATE" won't hold up to the savings I am getting from making homemade products. Thank goodness I did my research when I did because we ended up running out of laundry soap and I was totally against spending more money on store bought stuff.

Seriously you guys, this is the simplest recipe ever for homemade liquid laundry soap.

I originally found the No-Grate Liquid Laundry Detergent pin on Pinterest (the mecca of all wonderful ideas) and decided to try it out.


I thought to myself:
I'm so excited. That I just can't hide it. And I know, I know, I know, I know I'm going to save money. Money.

What I bought at Wal-Mart:

1 Box of BORAX - $3.38
1 Box of Arm & Hammer Super Washing Soda - $3.24
1 super big bottle of blue DAWN Advanced Ultra Soap - $8.XX

****I bought the bottle of DAWN at Cosco so you won't need a huge one and regular sized ones run a few bucks at Wal-Mart

I already had on hand:

Water
A tablespoon measuring spoon
An old container to use for the new laundry detergent - nothing bigger than 1 gallon

(FYI: Tandil is the generic ALDI version for TIDE. If, for some reason, you don't trust this recipe go to ALDI, if you have one, and buy the Tandil. It's like almost $7 which is WAAAY cheaper than TIDE but works just as well.)


Ok... here it goes... this is so simple... are you ready?

Here's the recipe:

3 Tablespoons BORAX
3 Tablespoons Arm & Hammer Super Washing Soda
2 Tablespoons blue DAWN


Once you have all of your ingredients in add your 3 cups of HOT water.


Mix it well with a wooden spoon or let it sit and cool off just so the ingredients melt well. I would not suggest shaking it, you don't want a ton of bubbles. After it cools, stir well if you haven't already, and fill your container up with water slowly until all the bubbles come out.


TA DAAAAH!!!

You now have new homemade liquid laundry soap for fractions of what it costs to buy at the store. And when I saw fractions, I mean FRACTIONS... it's ridiculously cheap.

I use a half cup per load in my HE machine.


TIP TIME

1.
I personally double the recipe. I'm sure a regular recipe would suffice, but for some reason it was too watery for me so I doubled it. It's probably just my "so use to thicker laundry soap" brain making me do it because others have successfully used the thinner version.

2.
Regardless if you use a more concentrated version like I am, or you go with the original recipe, it will work. I promise. At first you'll think... no way, look at this stuff, it's so watery. But I swear on the life of my HE washing machine, it will work. It even works as a mixture with bleach when you run a load of whites.

3.
Whether you double it or not, you're still saving an ungodly amount of money. I mean, look at the prices of the supplies! We're talking maybe $9 total and you probably won't need to repurchase new supplies for A YEAR. 

4.
If you're like me you're use to the thicker detergent. Starting out I couldn't tell you how many times I put this detergent into the dispenser at a million miles an hour only to loose 90% of it as it splashed out of the dispenser and onto the floor. Take it from me, slow down when you pour it.

5.
If you are worried about soap suds, fahgetaboutit. You'll get none. Nothing will set off your suds alarm on your washer. But with that said, you don't need SUDS to clean clothes either. You'll notice when you take the clothes out of the washing machine they will smell clean.


There ya go! Super cheap! Super easy! Super super!
If you decide to make some, let me know in the comments below!!

Make sure to pin one of my pictures from this post please!!!

Have a great weekend everyone!!

Friday, December 7, 2012

Well That's Pinteresting | Homemade Whipped Mens Body Wash

Yesterday I felt like I needed to be wearing a white lab coat while concocting crazy stuff in my kitchen. In all actuality the final product to what I originally planned on making whipped up another end result. No pun intended... ok, it was intended. I initially was going to work on creating some handmade liquid hand soap which I found on Pinterest.


I thought to myself:
Just as much as we need liquid hand soap in this house (I never buy it because it's so expensive), we need body wash badly for the boys, all three of them including my hubs.

I wonder if I would be able to swap out soaps and make something comparable to a body wash instead of just a hand soap.

My boys love the smell of Irish Spring, but hate the tackiness it leaves on your skin after you use it.
Would I be able to create a body wash with that soap and be able to ditch the tackiness in the process?

What I bought at Wal-Mart:

2 - 2 Qt Rubbermaid Containers - $1.98 each
1 - 6 oz bottle of Glycerin (found by skin protectants) - $3.88
1 pack of 2 bars of Irish Spring - $.94

I already had on hand:

A grater and large bowl
A blender/mixer
A pickle jar to hold extra shavings
A "tablespoon" measuring spoon
A "cup" dry measuring cup
A "cup" liquid measuring cup
A big pot to heat everything up with

(Disclaimer: I always buy a lot of stuff at Wal-Mart because I find it cheaper and easily accessible.
I'm sure you can find these supplies at whatever store you prefer.)


The first thing I did was grate the soap (I almost typed cheese.. silly me.) With it being deodorant soap it was soft and easy to grate. The recipe I used called for 2 cups of soap. 2 bars of Irish Spring shredded made 3 cups so I stored the extra cup in the pickle jar.


I then put 10 cups of water into my big 'ol pot and 2 tablespoons of glycerin plus the 2 (full, not packed) cups of soap. I turned the heat up and slowly brought it to a boil.


After the concoction came to a boil I didn't let it cook for long, just long enough to make sure everything melted. With the bars being deodorant they took a few minutes to melt down. When it was cooled down a bit I carefully poured the liquid into both of the containers. I could have poured into just one, but I didn't know whether it would expand or not during the cooling process.


After I poured out the liquid into the containers I was left with this crappy residue in the pot that I actually had to take my own dish soap and clean out. That distressed me because I didn't like the fact that I would have to clean soap with soap.

It got me thinking, "Uh oh... is this going to work?"


I put the open containers in the fridge to speed the cooling process up... I would say they were in there about 4 hours. When I came to get them out I noticed they didn't expand at all, they just gelled up after cooling completely. It was weird... like one big cold glop of gel.

Again I thought, "Dang... I don't think this is going to work."


So then my husband comes home from work and is like... "What are you doing?" I tell him I'm playing chemist today and he should check out my cool soap I'm making. He proceeds to shake the ever living CRAP out of one of the bottles after he scowls at the gross gel like substance it turned into.

*enter extremely bright light bulb above my head*

I whipped out my blender...
(again, no pun intended - Oh whatever, you should know me better by now...)
...and realized that I'm missing a gasket at the bottom of the glass top so I can't blend the soap to make it mix better. So I grabbed my mixer and plopped a container of the soap stuff in a bowl and beat it on a low/med speed. 


Seriously? Are you kidding me? Whipped body wash??

SCORE!!!

I used just one container - so half of what I created - and filled up our empty body soap dispenser from previous body soap I bought at Walmart (which was almost $4!). Then I had a TON left over. The whipping expanded it like crazy so I put a bunch of it back into one of the containers.


Ha, look at my wrinkled old looking hands. That's too much hot water use on your hands ladies... 

So this is what it looks like when you squirt it out of a dispenser. It's very foamy and soft. I tossed my 7 year old in a bath and used him as the guinea pig. I had to squirt about 3 pumps into a bath puff to get it to lather up well, but it definitely did the trick.

So let's do some math...
After looking at the cost of supplies up top, just for the soap and the Glycerin alone, you're looking at maybe 6-8 bottles of whipped body soap for $1.60?
I think it actually might be less than that.

Goodness... I'll bite at that anytime.

TIP TIME

1.
Unfortunately the tackiness the boys hate still slightly lingers around after a bath/shower. I'm sure that if you decide to use a moisturizing bar (even a men's bar like Dial for Men) it wouldn't leave this film. Good 'ol Irish Spring for ya...

2. 
After sitting all last night until today the whippedness of the soap is still whippy and holding well. It hasn't settled at all, which makes me uber happy.

3.
At first I didn't think I'd need the 2 containers, but it's a good idea to have them on hand just in case your batch ends up large.


Alrighty folks! That's my post for the day!
If you choose to make some of this please let me know how it goes!!

Make sure to pin one of my pictures from this post please!!

Next week I'll be making some more handmade cleaners so stay tuned!!!!

Friday, November 30, 2012

Well That's Pinteresting | Christmas Party Lights


Can I say that I just adore Pinterest?
I am so thankful there is a site where I can sit day to day and be thoroughly blown away by the creativity of people and have the ability to share things I love with everyone as well! That's where these posts come into play: real life pinterest recreations with tips and tricks on how it's done efficiently and inexpensively.

Just recently I saw a pin by Miss Mustard Seed showing the process of how to create very cute party lights with a string of white Christmas lights, dixie cups and scrap-booking paper.


I thought to myself:
Those are super cute and I bet you could make them specifically for
whatever party you are having by customizing the paper. 

I wonder how that would look with regular Christmas lights?

How would the paper hold up outside in the elements?

After checking out the visual instructions in the pin,
could there be an easier, quicker way to recreate this?


What I bought at Walmart:

1 bag of  Great Value 3 oz. 100 plastic dixie style bath cups - $1.98

I already had on hand:

An X-Acto Knife
A multi-color 100 bulb strand of lights
(if you needed to buy these supplies you'd be looking at about $8 total for both)


The first thing I needed to do was hang my lights up the way I thought they would look the best outside. I'm sure any 'ol way would work, but I draped mine across my front porch from one side to the next. I know they are kind of hard to see in the light during the day.

Hey check it out!!
There's my Christmas Gift Porch Decor boxes I recently posted about!
I really like the way they turned out, they look great outside!


I took my X-Acto knife and cut a half inch X shape in the bottom of the cups, that way the cups could stick right on to the lights with no problem. That's the end of a sharpie to give you a size reference.


I took all of the 100 plastic cups outside and for about 5 minutes quickly stuck them on every light (it was really stinkin' cold out there). They slipped right on and hung on pretty well, so it was pretty easy to do.


They could be Christmas lights, they could be Party lights, either way they turned out pretty nifty. I like the way the colors are projected through the cups. Instead of being one single dinky light it's a full cup of color awesomeness.

TIP TIME

1.
The reason I like using the plastic cups vs. the paper cups is they can get wet and they won't get ruined. The paper cups would work great for an indoor party, or even an indoor porch, but I believe this would be your best bet for something outside.

2.
With no cutting of a paper stencil to put paper on these cups it took no time at all to do this. It was super easy and cheap, especially if you already have the lights you want to use.

3.
You CAN write on these cups.
You can take a black sharpie and draw designs and make them more interesting than just regular light projecting plastic cups. With the lights flipping this way and that I wouldn't suggest letters. I wrote some on a few cups to see what it would look like and you couldn't read them.


There ya go! That was simple and fun, wasn't it?
I think I'm going to make these weekly posts on Friday's instead of Tuesday's that way you have something creative to work on for your weekend! Like you don't have enough to do right? haha!

Make sure to pin one of my pictures from this post please!!

Stay tuned for next weeks post when I start diving into household handmade cleaners!
It's time to take it back to the good old days and stop wasting so much money at the store!!


Related Posts with Thumbnails